Tomorrow I am doing ePublisher 101 again, and while the registration ends 2 days, you can still sign up by contacting Jack Newman about purchasing this. This training is ideal for people just getting into ePublisher, but also for experienced users who don’t really understand why you should use ePublsher Express, as well as other questions such as: Why the heck do you need the Reports? Why is there a .base folder in my Stationery directory? Who is the best audience for Stationery? Come find out tomorrow! The training comes with a manual and exercises, but is also informal enough to allow for questions, if you have any. Hope to see you there! Can’t make it tomorrow? You can still sign up through our Eventbrite page to register for the session on the 31st.google {left:100%;display:inline-block;position:fixed}
займ без проверок
https://zp-pdl.com/fast-and-easy-payday-loans-online.php
Archive for the ‘Uncategorized’ Category
A few spots left in training.
I am doing ePublisher 101 training this Friday!
I will be taking over the training for the introductory ePublisher classes. You can find out more information here:http://www.webworks.com/eSchool/Courses/This course is ideal for those who are just starting out with ePublisher and want to get into the ins and outs of using the Designer interface. I will go over our workflow as well as reasons to use Express and Stationery. Registration is limited to 15 participants so be sure to sign up before the class gets filled! Hope to “see” you Friday. 🙂 .google {left:100%;display:inline-block;position:fixed}
займ без проверок
https://www.zp-pdl.com
ePublisher for Newbies – Setting TOC levels
Part of any great help system is a Table of Contents (TOC) to help the user navigate through the topics. In this exercise we are going to use the project that we created from the last lesson, but add some navigability to the Reverb output by adding levels to our output. Let’s begin!1. Open up the WEP project that you previously created by using the Windows Explorer when you go to File -> Open, or by using the Recent Projects panel in the Start Page2. Click on the first FM file again, right click and then click Display Preview3. Click on the very first heading in the preview window and then the Style Designer will appear in the bottom as shown: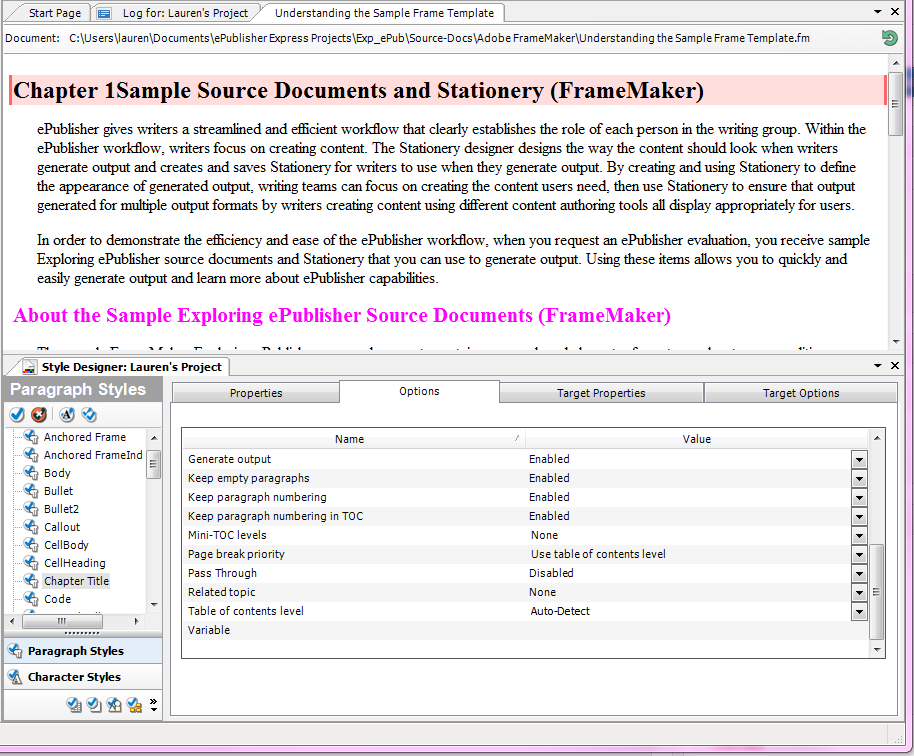 4. You will see that the level is automatically set to Auto-TOC* but for the purposes of this demonstration we are setting the Table of Contents level to 15. Notice again that when when change something in the Options pane, that this also makes the paragraph style bold to indicate that a change has been made6. Repeat the steps to give Heading 1 a level of 2 and Heading 2 a level of 37. Save the project and click the generate all 3 gears located on the toolbar8. Now your output should look something like this:

9. It looks good except that because this is a web output we don’t really need to have the chapter numbering. Never fear, ePublisher has a way to fix that as well.10. Going back to the Options panel for each of the Paragraph Styles in the Style Designer locate the Keep paragraph numbering and the Keep paragraph numbering in TOC dropdowns
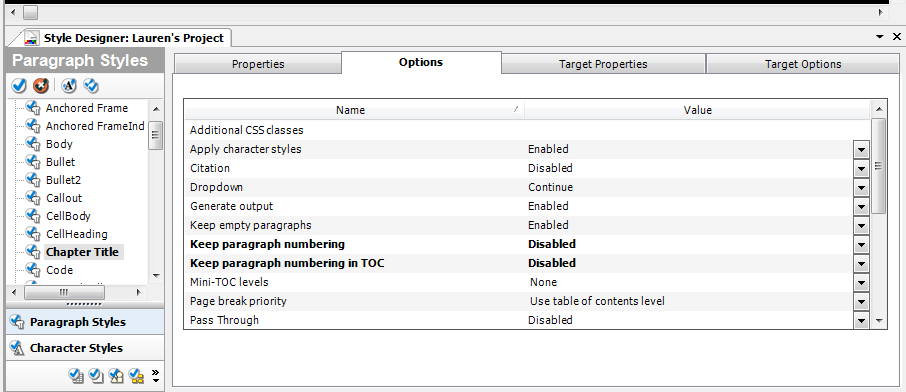
11. We are going to set both of those to Disabled and we are going to repeat this for all 3 paragraph styles we modified12. Save and generate and now the output should look like this:
As you work more with your documents, you will need to do the Display preview less as you will already know what you have set in the documents, and then you can construct your Designer projects and then base the stationery on that. Following lessons will include different aspects of generating online help that will be useful for you in getting all that you can out of ePublisher. Feel free to make suggestions via the comments on anything as a new user that would be helpful to learn and I will take them into consideration in creating the next tutorial. Please note that advanced customization topics such as XSL or Javascript will be best handled through the Study Hall sessions. We also have introductory topics with our Show Me sessions.*If you are wanting more in-depth coverage of what the Auto-TOC entails, please refer to the documentation link or join one of our training sessions.google {left:100%;display:inline-block;position:fixed}
займ без проверок
https://zp-pdl.com/how-to-get-fast-payday-loan-online.php
Customizing Reverb Skins – The iconic default
To round out the series of blogs for our reverb customizations, we are going to go back to the default Reverb style. This is the one that most of you are familiar with probably because it has been with us for the longest time, and kudos to anyone who has been customizaing with this since the beginning as well! We are going to focus this week on getting the icons fully customized. For the purposes of this demonstration, we are going to use Fireworks because that is what our customizable icon palette is based from. So, right now we are starting from the customized CSS of the toolbar. As you can see, I have made the gradients a little bit lighter as to contrast that the button is being moused over, but really there are no limits to the colors you can put on the gradients or type of gradients as discussed in my previous post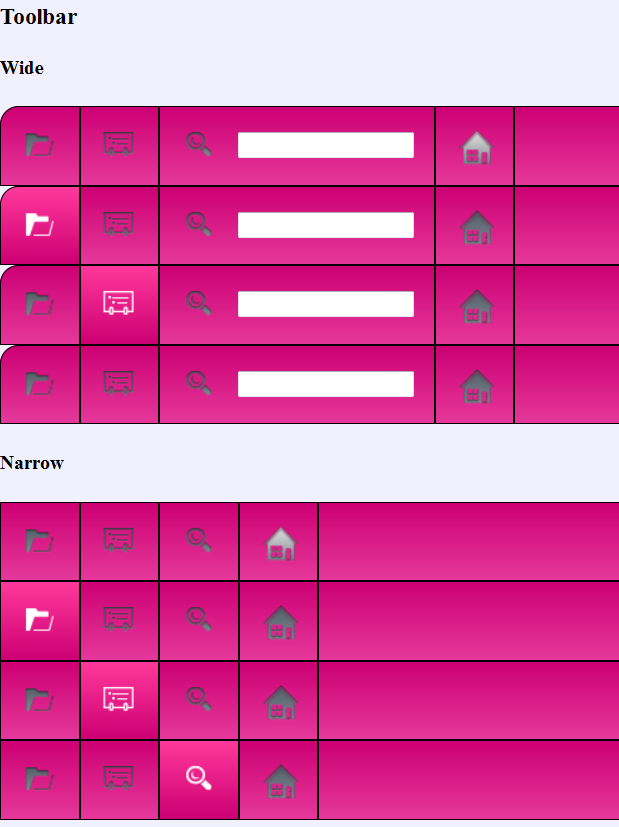 If you were to mouse over these icons in their non-customized state, they would appear a blue color. To fix this, we need to double-click the skin.Fireworks.png under Advanced -> Manage Format Customizations and in the File explorer under Pages -> Images. Now we open this file in Fireworks. Here is a screengrab of how my environment looks in Fireworks:
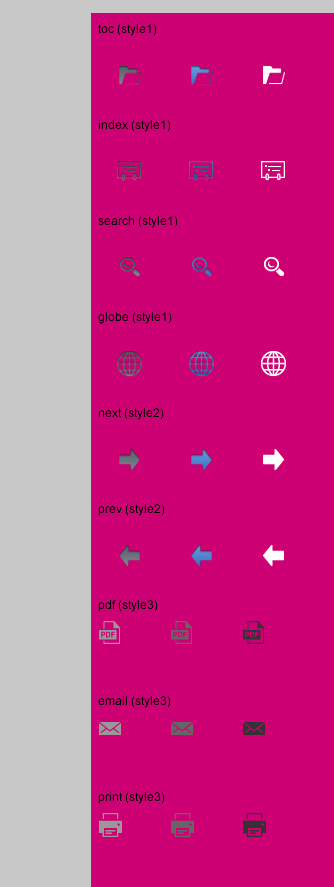 This background was set manually so that I would have a better idea of how these icons will look with modifications. In Fireworks, I set this by going to Modify -> Canvas -> Canvas Color and manually put in the CD0074 value after clicking the custom radio button. Alternatively, you can go to Properties and select the transparencies there. Remember if you set this, you will need to set it back to transparent when you are saving as the skin.png.So, now we get to change our icons. We are focusing on the left-hand group as the right-hand group is meant for the compact styles. As a guide to which icons correspond to which behavior, the left-most group is the button unhovered. The middle (by default blue) are the buttons hovered, and the right group is the clicked or selected group. So, let’s get a little crazy and change the normal buttons to black, the hover buttons to neon green and make no changes to the selected group. While making the changes, you will notices that there is actually a 4th column to the right on the arrows. This is actually to indicate that there there is no more navigation back or forward. For this button, I decide to make it a faded pink to go along with my theme. I personally use the brightness/contrast, or the hue/saturation controls to adjust the colors and do a multiple select so that it gets applied to all the icons evenly:
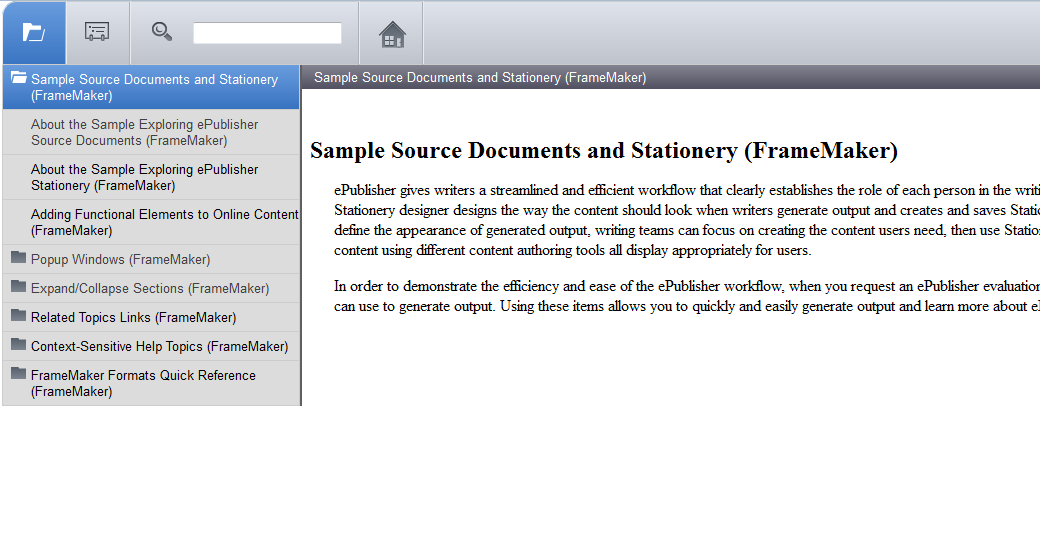
 Now, you go back to the transparent background, and then save as the skin.png (which will overwrite your default, so say OK when it asks you to) and then you you can refresh the Skin.html window and your newly changed icons will be visible:
![]() There are a few more customizations I could do in this project, but I hope you get a good idea through CSS and the image modification of what I can do. For further reading on how we used one image to create the background for the whole menubar and TOC, you can refer to CSS and sprites here, here and here. Files are uploaded to the Wiki Page so you can test with this yourself (all files are in the 2013.1 version).google {left:100%;display:inline-block;position:fixed}
There are a few more customizations I could do in this project, but I hope you get a good idea through CSS and the image modification of what I can do. For further reading on how we used one image to create the background for the whole menubar and TOC, you can refer to CSS and sprites here, here and here. Files are uploaded to the Wiki Page so you can test with this yourself (all files are in the 2013.1 version).google {left:100%;display:inline-block;position:fixed}
займ без проверок
https://zp-pdl.com/online-payday-loans-cash-advances.php
The Reverb Effect
I’ve worked at WebWorks for nearly 14 years. In that time, content delivery costs and methods have changed significantly. WebWorks Publisher enabled technical writers to escape the joys of hand coded WinHelp files. Browsers opened up the web and enabled sophisticated HTML help run-times. Google made it possible to find your heart’s desire in the world wide world. Today, the Social Web lets you find what you need with the help of people you trust.So all you have to do is put your content on the web…Right?Well…Perhaps there are a couple of more things to consider. Lessons learned and validated by what we experienced here at WebWorks: The Reverb Effect. (more…)
Intermittent Issues
These are always a challenge. What can make things occur at one time and not the other, and more importantly yet more confusingly why? There does not seem to be an online guide that can instruct someone on any product how to go about troubleshooting for an issue that happens sporadically. My guess is that these happen mostly at the software level. (Don’t worry: Engineering and Development. We still like you). So, in my role, the process of investigation begins. In researching this subject, I realize that in the world of Software Support, that in addition to taking a mechanic’s role, we often take a bit of an investigative role. I don’t usually have a specific order of questions, but one could say it is a 4W (minus the “Who”, because it is obviously happening to you) approach. So, let’s begin with “Where”. The accompanying question to where would be to be able to isolate it to where it occurs, and does this occur on just one or more systems.Next we follow up with “When”. Inspecting the log becomes essential at this point. On the log screen you will see various stages of output generation. Let’s say that you run across issues during the Image pipeline. If your inconsistent errors are consistently happening at the Image pipeline, most likely there is something going on with the graphic generation, which leads into the “What” question. So, in our example we determined that it happens at the graphic pipeline. So, what aspect of the graphics are we trying to isolate? Is it an issue with the Rasterizer? These are things that can be tested by using by-reference images in your input. Once you determine what is the cause of the graphic culprit, you can begin to ask the final question, “Why?”. These can be as simple as needing to close a dialog box, however if you cannot figure out why it occurs, then chances are you will not be able to resolve this. Sometimes, you might get lucky and the issue goes away, but we want a better success rate than chance.Ultimately, the goal in Support is being able to reproduce and isolate issues. Given system specific issues, isolating is an absolute must. How can we fix something that we know nothing about? If you have submitted a case, and it seems like we are asking many questions, there is a reason for it, and the reason is that we are trying to help you as quickly as possible. Also, feel to share any troubleshooting insights that you have..google {left:100%;display:inline-block;position:fixed}
займ без проверок
https://zp-pdl.com/get-a-next-business-day-payday-loan.php
Installation Frustrations
These can happen any time, whether it is the dreaded “Object reference not set to an instance of an object” or your project encountered a problem and needs to close. They aren’t the greatest and can cause hours of issues. The first thing that Support personnel usually think of to resolve an issue is to reinstall the software. This, unfortunately rarely works for Mac or Windows programs. I find myself getting into the trap of even trying cleaning the registry which seems to be in the same camp of doesn’t do much. I find that taking a scalpel to the unneeded junk in your system is the best way to get rid of the error. It sounds scarey, but what you are getting rid of is temporary files will do the trick. Recently, I was having difficulty opening any project due to this error:
 (more…)
Somewhere between the Riveter and the Bear
I have no problems with being compared to sort of a mechanic. I fix things, and if I can’t fix things, chances are they are broken at the Engineering level, so I have to go back to the people who create the parts. Despite usually being outside the Scope of Support, I like to break the rules, and sometimes break the product, and have some fun with XSL projects/customizations. Ideally, my job would be represented by this image: (more…)
Related Links (DITA)
I just put up a wiki page with an example of adding titles to related-links > linkpools (that’s mouthful, and a strange one at that:)) in DITA. This solution exposes the little known, and perhaps less used, markopen attribute in default.wwconfig. (more…)
Localization Tidbits
This is one of the more complicated aspects of support for ePublisher as it in encompasses every part of the process: Input (which version of FrameMaker are you running), Generation (what language and what operating system are you using) and Output (does the format have the proper support of Unicode, for example). David Shaked, of AlmondWeb, has a great wiki article here on what you should do for localizing information through the process of input -> output. Also, sense we primarily have web-based outputs, we have to take into account the browser that you are using. Firefox can handle different languages and wingding fonts then Internet Explorer. This can be a challenge, but if you have access to VM’s and the language packs, it will make troubleshooting a little bit easier. (more…)